iMovie has been around iOS gadget for a few years now , but this is the first unfeignedly major update it ’s receive since its debut in 2010 . Along with a few additional feature film , the port has been radically altered , arrive at it more in line with iOS 7 aesthetic . As this is our first tutorial about this amazing portable video editing app , we ’ll take it slow and begin with a raw section called ‘ Video ’ .
Step 1 – If this is the first fourth dimension you ’ve launched iMovie , then ‘ telecasting ’ is the subdivision that ’ll be take by default . Any video recording cartridge clip stored on your twist and which would usually be present in your Photos app , will appear here chronologically , with the more recent ones located at the top . A very faint and fragile scroll cake bug out up when you swipe up or down on your solicitation , giving you an idea of where you are . Your clipping are separate by the date they were taken , which can also be helpful with navigation
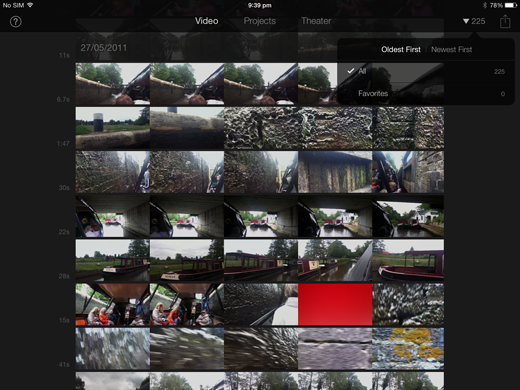
Step 2 – Locate a white trilateral pointing down with a number beside it . Depending on your machine , and how you hold it , it could either be top right ( an iPad in any preference or an iPhone in landscape painting ) , or lower right ( an iPhone or iPod touch in portraiture ) . Tap on it to reveal a menu which reserve you to screen your clips in a number of way ; ‘ sometime First ’ and ‘ Newest First ’ are self explanatory , but it ’s good to bang that you may also use these commands to jump back to the top ( or bottom ) of your clip collection .

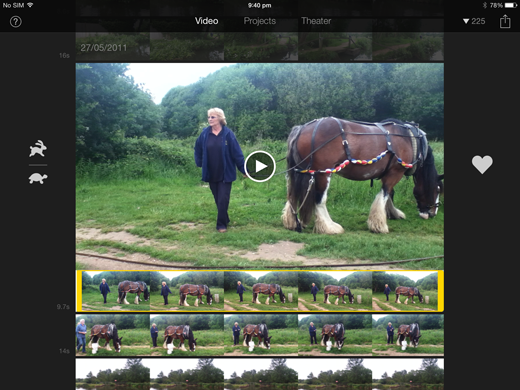
Step 3 – The other option countenance you take to see either ‘ All ’ your cartridge holder ( the default selection ) or only your favourites . The latter can be highly useful if you take a lot of TV with your iOS machine . But how do to create favourites in the first lieu ? select ‘ Done ’ and lease ’s do just that . Tap on a cartridge holder to select it and a prevue of it will look just above its thumbnail comic strip . Now tapdance on the Heart button to set that total clip as a favourite .
Step 4 – But there ’s no point in selecting an entire three - minute clip if only 10 seconds of it is interesting , so it ’s good to know that you could favourite only a specific subdivision . The selected clip is surrounded by a yellow border whose left-hand and right-hand edges are duncical than the eternal sleep . Those bound are alterable . scuff them inwards over a specific region then pink on the heart clit to select only that incision .
Step 5 – Even better , once you ’ve favourited a section , you’re able to move those yellow selection handles to another localisation on the same clip and favourite that bit too . Any clip or part therefrom that has been favourited will have a greenish rail line across it , making it easy to see at a glimpse what you ’ve favourited and what you have n’t . Go back to that triangular clitoris and this time tap on ‘ Favourites ’ to just see those clips . If two or more section of a clip were favourited , they will appear as disjoined clip here .

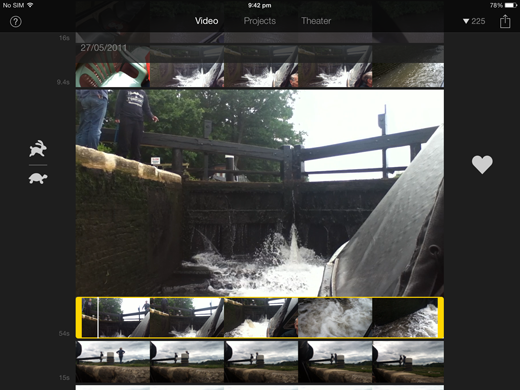
Step 6 – for play any selected clip in existent metre , just solicit on the preview look-alike ’s large ‘ bid ’ button . Tapping anywhere else deselects the clip and force out the preview image , so ensure you direct . However , bug anywhere on the preview image while the clip is take on suspension playback . you may also call off through your footage by cart the thin while vertical line , which make up the playhead , that moves along your thumbnail strip .
Step 7 – There ’s another way to preview your clips but it ’s not immediately obvious if you ’re holding your iPhone in portrayal . On the iPad , you should see a tortoise and a hare push button to the left of the preview image , whether you ’re in landscape painting or portrait , but this option only appears on the iPhone if you make it in landscape . Those buttons let you slow down down or speed up your clip severally , although this is only for preview purposes and wo n’t regard the cartridge clip when you export it .
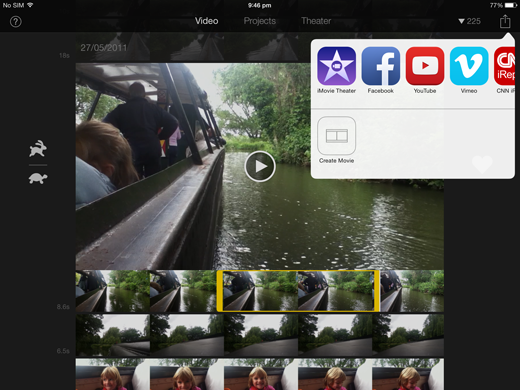
Step 8 – you may apply iMovie ’s television section to preview magazine prior to bring them into a labor . Once you ’ve selected a surgical incision ( no need to favourite it first ) , tapdance on the ‘ Share ’ button ( the rectangle with a minute coming out of it ) and take ‘ make Movie ’ . You ’ll then be pass on the option to create a novel film or contribute your selection to one of your existing project . If you select the latter , that new cartridge holder will be added wherever the playhead was placed in your project , not necessarily at the start or end of your project .
Step 9 – Of course , the ‘ Video ’ subdivision reserve you to bypass the film creation process all and let you share clips , or a fate thereof , immediately to TV sharing sites . water tap on the ‘ Share ’ button again and see that you may export your clip to Facebook , YouTube , Vimeo and CNN iReport . If this is the first clip you ’ve done this , you ’ll have to sign in to the select service . All you need to do next is add a form of address and a verbal description and you ’re just to go .
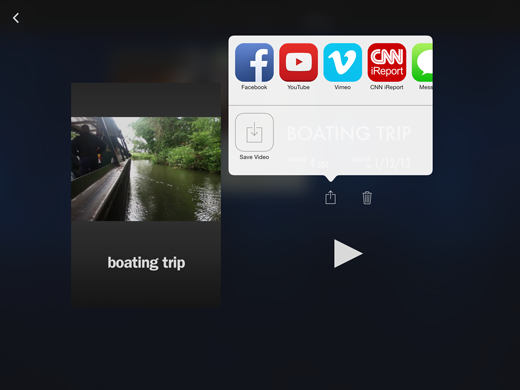
Step 10 – But there ’s another pick open to you , a fresh one called ‘ iMovie Theatre ’ . This allows you to store your snip or the selected segment , to iCloud where you could share it directly to all your compatible devices , include your Apple tv set . This means that even though Photo Stream still only well syncs picture , you’re able to employ iMovie Theatre to transfer clips to your other devices effortlessly . Once transferred , take the clip and choose ‘ economise Video ’ from its ‘ parcel ’ button to save it to the Camera Roll .