Over the last several months we ’ve covered numerous bakshis for producing better prints , and it ’s a mess of info to recall . This clause presents a ready to hand retread as well as a guided tour through the Print dialog boxes of popular software program such as iPhoto , Photoshop Elements and Photoshop CS5 — include tips for borderless printing .
Printing recap
The first measure to ensuring outstanding prints is to understand that your images are made from pixels and how to control pixel sizing using solving , as discussed inImage resolution — the key to first-class prints . The next footstep is to download printer- and paper - specific profiles for near coloring material accuracy . you may get the skinny on profiles and where to find them by call in How to use printer visibility for colouration fidelity . If you enjoy maximum ascendancy over your prints , and you ’re using Photoshop Elements or Photoshop CS5 , you could lop , resize your photograph , and adapt its resolution manually as talk about in bothHow to resize digital icon for printand How to resize little images for print . That said , countenance ’s turn our aid to using the print dialog boxes of popular software to produce amazing prints — without the hassle of resize them first . While the screenshots and examples below are from Snow Leopard , the concepts and summons process the same way in Lion .
Using iPhoto ’11
Printing from iPhoto is a snap . Just choose the photo(s ) you want to print and choose File - > Print ( or press Command + P ) . iPhoto ’s Print configurations pane appears wherein you’re able to choose a theme from the list on the left . Standard farm a plain photo with optional caption ( under the Layout button ) and white , gray-headed , or black allowance . Simple Border is much the same , though Simple Mat and Double Mat get interesting — both options let you add a composition board anatomy around the photo that prints right on the Thomas Nelson Page ( a gravid manner to add more impingement to your icon ) .
If you ’re print borderless , make certain to prefer a paper size that includes the intelligence borderless — that is , if your printing machine is capable of publish to the paper ’s edge — or your pressman will slap a border on it anyway . Once you ’ve picked a theme , use the pop - up bill of fare at the bottom of the print pane to choose your pressman , paper sizing , and print size . If you ’re print borderless — meaning you want the photo to extend to the edges of the paper — choose a newspaper size that includes the word borderless . For instance , to produce a borderless 8.5 - by-11 print , choose US Letter ( Sheet Feeder – Borderless [ Auto Expand])—or a similar option — from the Paper Size drink down - up computer menu ; the Print Size pop - up menu changes to Borderless mechanically . ( If it does n’t , you may change it manually , though Borderless appear as an alternative in the Print Size carte du jour only if you ’ve take a Paper Size that include the word ) .
If you ’d like to customise the theme you picked — say , change the border or lusterlessness colour — click the Customize push . If you ’re ready to print the photo , click the Print button to launch the Mac OS X mark dialog box . prefer Printer options from the pop - up menu in the middle to summon options such as paper type ( called Media Type ) and thus impress caliber . When you ’re finish , tick the Print button and heed for the sound of your printer .
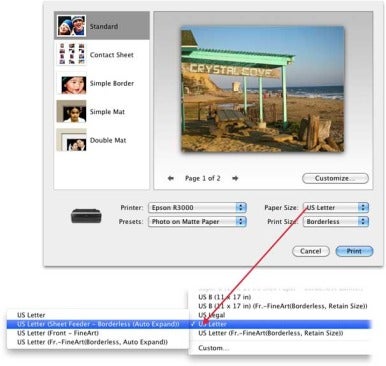
If you’re printing borderless, make sure to choose a paper size that includes the word borderless—that is, if your printer is capable of printing to the paper’s edge—or your printer will slap a margin on it anyway.
count on the manufacturing business of your printing machine , you may see slightly dissimilar options here ( nevertheless , there should be standardised preferences ) . By choosing Premium Photo Paper Glossy from the Media Type kill - up menu , the output resoluteness changes automatically to suit the printer you ’ve chosen .
Using Photoshop Elements
When you ’re ready to print in Photoshop Elements , choose File - > Print and then pick your printer and desire paper size of it from the pop - up menu on the right of the result ( whopping ) dialog box . Here again , if you want to print to the edge of your exposure paper , choose a paper size that include the Holy Scripture borderless or NMgn in the name , which stand for No Margin . For example , to produce a borderless 8.5 - by-11 image , choose Letter . NMgn ( or a exchangeable selection ) from the Paper Size pop - up menu and then choose Custom from the Print Size pop - up menu ( 8.5 - by-11 is n’t a preset in this carte ) . In the result dialog box , turn on the Scale to Fit Media option . You ’ll see the paper size you choose in the tallness and width fields and Elements ’ resolution deliberation underneath .
As you may see , Elements is felicitous to calculate resolution base on Paper Size and Print Size . you may mobilize this dialogue box seat by choosing Custom from the Print Size carte du jour or by clicking the More Options button at the bottom of the Print dialogue box .
Click OK to turn back to the Print dialog boxful . If you did n’t crop your image to your desired print size first , you may see snowy sharpness in the print preview . If so , check the Crop to Fit checkbox and Elements will enlarge the photograph slightly . Click Print and in the resulting Mac OS X Print dialog boxful , choose Print preferences from the pour down - up menu in the middle , and select the report you ’re using in the Media Type pop - up menu . Click the Print button and your pressman will recoil into action mechanism .

Depending on the manufacturer of your printer, you may see slightly different options here (nevertheless, there should be similar settings). By choosing Premium Photo Paper Glossy from the Media Type pop-up menu, the output resolution changes automatically to suit the printer you’ve chosen.
When you let Elements resize your trope , you give up control over how the image is lop .
Using Photoshop CS5
The photographic print unconscious process in Photoshop CS5 is nearly the same , though it lacks element ’ Crop to Fit checkbox . Choose File - > Print and nibble a printer from the Printer pop - up menu at the top . dawn Print options to open your Mac ’s Print dialogue box and opt Paper Size and Media Type as we ’ve done earlier . clack the Save button to return to Photoshop ’s print dialog box .
If you did n’t resize your paradigm first , turn on the Scale to Fit Media option in the center . If you see a ashen bound in the print preview , turn off Scale to Fit Media and experiment with a dissimilar scale portion until the print prevue looks in effect . For model , if reverse on Scale to Fit Media buckle under a 28 percentage sizing reducing , try 30 percent or else .
Photoshop does n’t have an auto cropping option in its Print dialog boxful , so it ’s a just thought to crop and resize your images first . Nevertheless , you’re able to always experiment with the Scale part yourself , as shown here .

As you can see, Elements is happy to calculate resolution based on Paper Size and Print Size. You can summon this dialog box by choosing Custom from the Print Size menu or by clicking the More Options button at the bottom of the Print dialog box.
As you could see , producing utter inkjet prints is n’t rocket scientific discipline , but it does take several steps . The more you do it , the sluttish it will get ! And remember , if you ’d like to bring through on paper costs and gang multiple images onto the same page , take a peep atHow to print multiple images on a undivided varlet .
[ Lesa Snider , generator of Photoshop CS5 : The Missing Manual and coauthor of iPhoto ’ 11 : The Missing Manual ( Pogue Press / O’Reilly ) is chief evangelist ofiStockphoto.com , a prospicient - time appendage of the Photoshop World Instructor Dream Team and founding father ofGraphicReporter.com . ]
Photoshop CS5
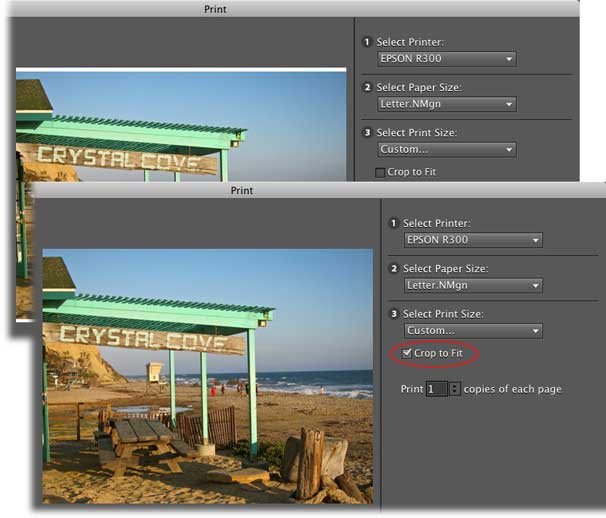
When you let Elements resize your images, you give up control over how the image is cropped.

Photoshop doesn’t have an auto cropping option in its Print dialog box, so it’s a good idea to crop and resize your images first. Nevertheless, you can always experiment with the Scale percentage yourself, as shown here.
