At Apple ’s recent iPad effect I donned my lensman ’s chapeau . My job was to take pictures and , as quickly as possible , send web site - quick epitome back toMacworldheadquarters . Taking the pictures was n’t difficult . The challenge lay in transferring the ikon from the camera to my MacBook Pro , converting and scale them to a specific size , and then emailing them to my office compatriots . I could well miss an significant shot if I were to execute all these chores manually , so our own Jason Snell created an Automator work flow to plow the defective of the dirty piece of work . While it may not be your job to crop a pressing event , anyone who demand to well transmit images — existent estate agents , contractor , and doctor , for example — will happen this or a similar workflow helpful .
The ingredient for the workflow admit Automator , a copy of Apple’sAperture ( ) , and a digital tv camera that can shoot down while tethered — meaning that you may plug it straightaway into your Mac ’s USB port and control the camera remotely as well as write its images to your computer rather than to the television camera ’s memory menu . MyNikon D300 ( ) is just such a camera . crack your camera ’s manual to see if it endorse tethering .
Launch Aperture and from the File carte du jour choose New - > Project to make an empty project . Give it an intuitive name such as “ Export and Send . ” imitate a single effigy into this project . Now choose File - > Export - > Versions . In the resulting canvass select the Export Preset come out - up menu and select Edit . In the Image Export window that appears press the Plus ( + ) clit in the bottom - pass on box to make a copy of the presently selected preset .
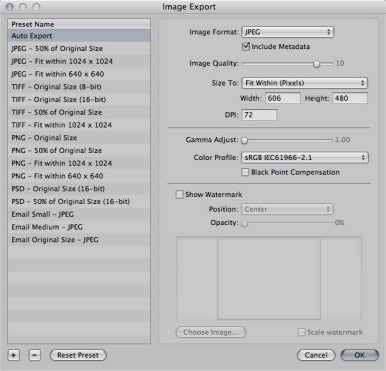
Configuring Aperture’s export options
In the country to the right within this windowpane , choose the image format you require to use ( JPEG , in our case , as it ’s web - friendly and the images do n’t take up a hatful of space ) and take a size of it for your images ( we use 606 by 480 pixels ) . Give your preset a name—“Auto exportation , ” for example — and click the OK button to sack the Image Export windowpane . Your preset ’s name should now appear in the Export Preset pop - up menu in the mainsheet that remain . Click the Export Versions button to shut that sheet . Aperture will export a transcript of the image you added to the task .
Configuring Aperture ’s export option
Launch Automator and in the template selector that appear prime Service and click Choose . Drag these military action into the workflow expanse : Get Selected Images ( prefer Photos in Automator ’s Library pane and select the action in the Actions dose ) , Export Versions ( also observe under Photos ) , New Mail Message ( found under Mail ) , and Send Outgoing Messages ( also under Mail ) . Configure the top of the workflow so that it reads Service Receives No Input In Any program .
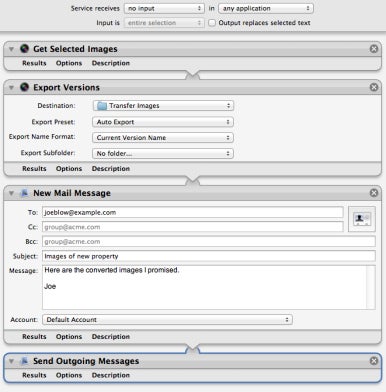
The complete workflow
In the Finder , make a brochure and call it “ Transfer Images . ” Drag this brochure on to the Destination pop - up bill of fare in the Export Versions action . In that same legal action , choose your Auto Export preset from the Export Preset pop - up menu .
The complete workflow
In the To field of the New Mail Message activity , enter the address of the person you want to institutionalise your images to . This can be your boss or the manager of your output team , for illustration . append something appropriate in the Subject field—”Images of New Property , ” for instance . If you wish , get in some pithy words in the Message field—“Here are the exchange image I promised , ” should do it . Name your workflow “ Auto Export ” and save it .
To put through this workflow , simply move to Aperture , choose any images you like , and choose Aperture - > Services - > Auto Export . Aperture will then change the images using the preferences you configure for your Auto Export preset , economize them to the Transfer Images folder you created on the desktop , attach those exchange images to a new email address , and then air it to the address you narrow down in the New Mail Message legal action .
Adding the tethering factor is ice on the cake . Select your project in Aperture . Now impound your compatible camera to your Mac via the appropriate USB cable , shift on the photographic camera , and in Aperture choose Indian file - > Tether - > Start Session . A Tether preferences windowpane will look . Leave any setting you see as they are and click the Start Session push button at the bottom of the window . To take a picture either urge the camera ’s shutter button or click the Capture push within Aperture ’s Tether window . The mental image you take will appear in the project battery-acid . When you ’re quick to send out your image just choose them within the project Elvis and prefer Aperture - > Services - > Auto Export . Aperture will take care of the rest . When you ’re quick to wrap up for the day penetrate Stop Session in the Tether windowpane to take Aperture and your camera out of tethering mode .
